
Hello everyone! Here is another fun project, this week is sewing!! I want to apologize in advance for the length of this post.
There are a lot of steps. :)
So, its summer and all I want to do it be outside... One small problem. My little baby. She is almost 6 months, and I never thought about what summer would be like with a baby. We having been going to the park, library, and swimming too. The only thing with most of these activities, is that she is on her stomach and back for most of them :) She is a roller and loves to play, but is not ready for anything beyond laying on the grass (or in a tunnel at the park), sitting with a little help here and there, and the occasional baby swing...

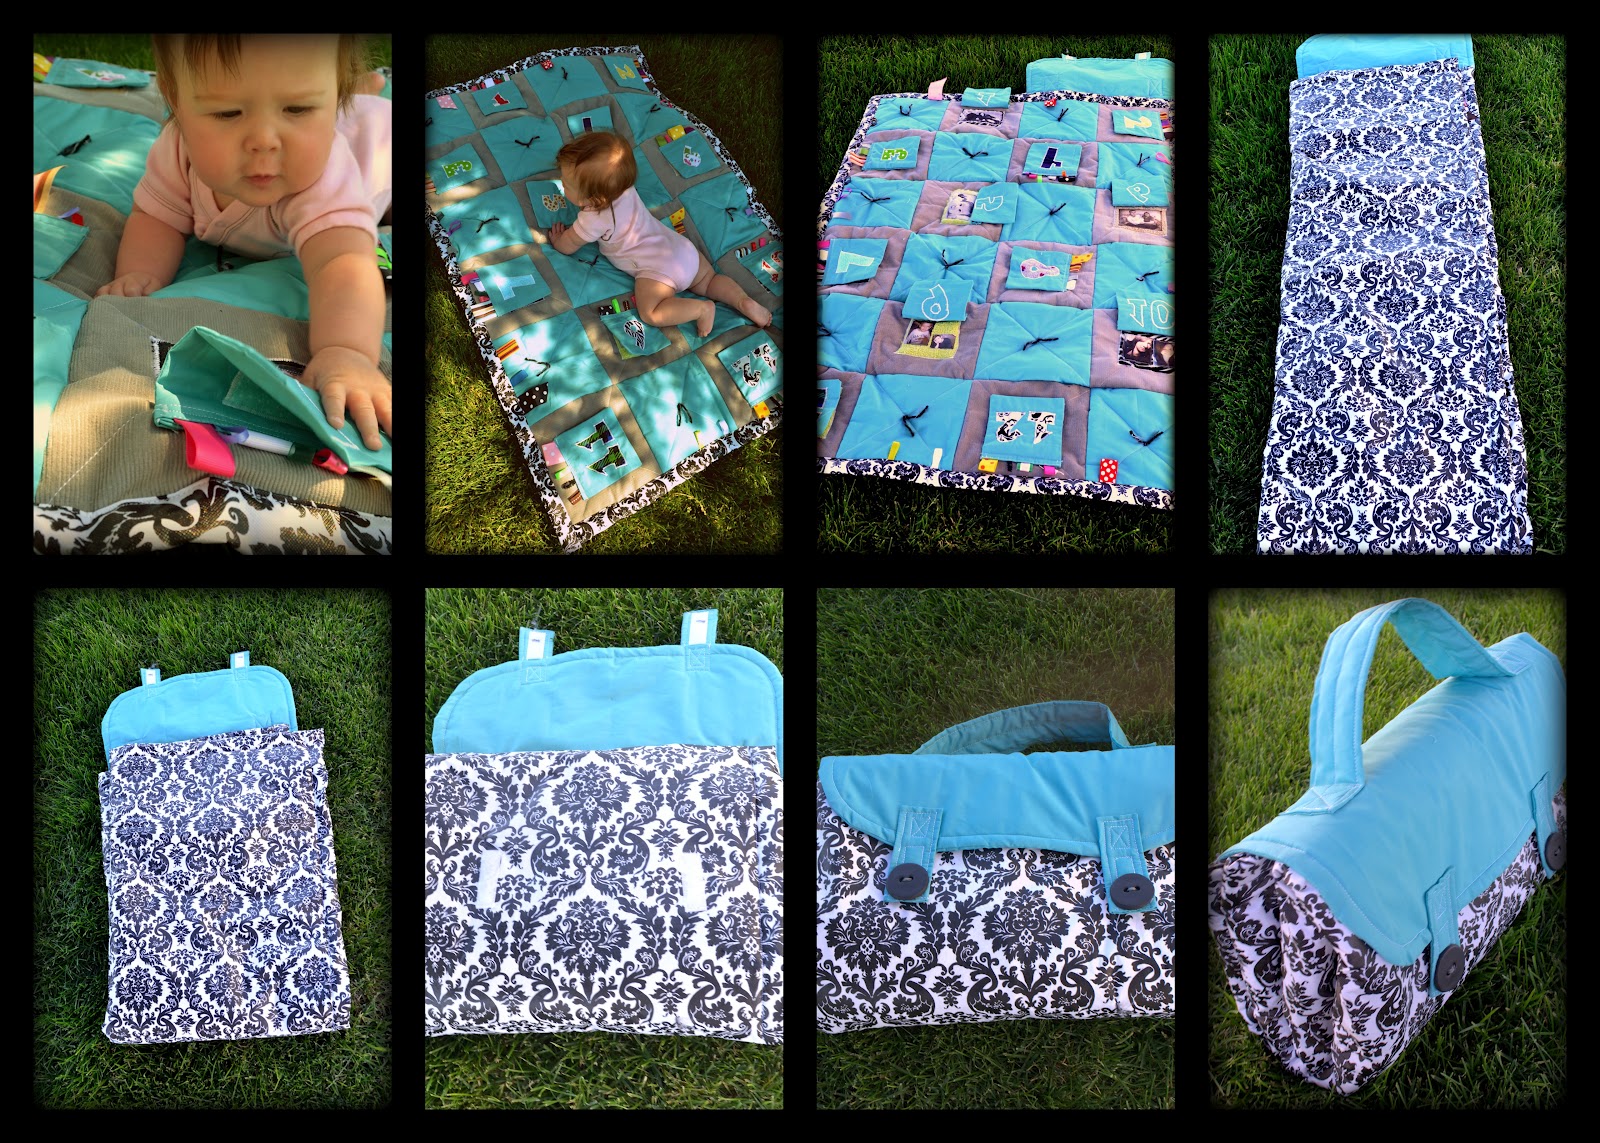
SO... I made her a outdoor play mat that she can roll all over, learn, explore, and play and play.
I made flaps with toggles, numbers, textures, pictures underneath, and a crinkle noise. The best part is that I can just wipe it off when I am done, and fold it up to go!! Not gonna lie this turned out to be a bigger project than I thought it would be, but it will be well used. Also the only things I had to buy were the vinyl backing and the flat sheet, so it was pretty cheap. Wanna make one too?? DIY below:
Materials:

1.) I purchased one yard of vinyl tablecloth from Walmart. They come on huge rolls, and usually have them tucked back somewhere in the fabric area. It was only $2.97 for a yard, and it was 54" wide, so by itself, it was a great size for the back of a blanket. A tablecloth would work too, I just found this was cheaper...
2.) Fabric you want to use for the squares on the front. I bought one twin flat sheet from Walmart for $5.00. and still had half left over afterwards. The rest of the fabric was stuff I had on had, and scraps etc. I tried to choose something with a soft texture for her to play with.
3.) Mixed ribbons and string. These were all scraps I had from other projects
4.) Cellophane wrapping. I used some that I had saved from a gift given to me... (I know kinda hoarder-ish... but I used it:)
5.) Random fabric scraps and chunks for the numbers on the front of flaps. If you don't have scraps because you don't hoard them like I do :)... you can buy fabric squares for quilting for 0.99 cents at Walmart...
6.)Batting for quilts.I already had some , but cheap alternatives could be found in thrift stores like i did, or maybe Christmas fake snow blankets?? never tried just thought about...
7.) draw and cut or print out numbers 0-9 as patterns for your numbers
8.) tissue paper to make your own square pattern for front squares
9.) optional: sew on printable paper:I printed out pictures of family members and sewed under flaps...
Steps:
1.) create your patterns*:
I measured out a 9" x 9" square on tissue paper and cut it out. I did this based on the measurements of the back table cloth material since I wanted it to be about that size.
I also made one for the flaps measuring 5" x 5".
Then I drew out the numbers and cut them out of computer paper, print them out would work fine too, or even iron on letters, I just wanted to sew them.
* see materials picture above for picture reference
2.) Print your pictures:
I just made an arrangement in word fitting as many as possible to a page, and made sure I planned out enough for 12 flaps. I chose family pictures, so that she could start learning names at some point:)
3.) Cut out your squares:
Place pattern on top of desired fabric choice #1, #2, and cut 12 squares of each color. Also cut 24 pieces of batting to match each square.


4.) Stitch the batting to the fabric squares:
I did an "x" pattern going from corner to corner.

5.) Do the flaps:

1.) Use your pattern and cut double thick square by cutting in on the fold of the fabric, so you get one long rectangle when opened.
2.) cut cellophane to fit inside of the square. Sew up the side of the square leaving the end open. Turn right side out to put the seams inside. slip the cellophane inside the pocket. ( should look like a pillowcase...)
fold ends of little pillowcase toward the inside and stick under needle to sew closed.
3/4.) use cut ribbons, and string, and stick into the seam of the open pillow case. Place them in randomly as you sew, making sure to catch them in seam.
5.) draw out numbers 0-9
6.) cut them out
7.) place on scraps of fabric and cut out each number going up to 12, re-using some numbers once you reach the double digits. Put your sewing machine on the zig- zag stitch, and turn the length really low so that it stays in the same place longer than usual. If you don't have this option, just drop the feet on your machine, and pull through at desired speed.. Go around each number using this stitch, pivoting on the corners, by leaving the needle in the fabric as you turn it. back stitch, to end.
8.) all of my numbers done, and the all make the crinkle noise:)
6.) Use your pictures:

1/2: ) Cut out your pictures from, the printable material.
3.) cut out a fabric to back it
4.) stitch to fabric using regular stitch
5/6.) zig- zag stitch to place them onto your colored square, pivoting at the corners
7.) use fray stop on edges of picture just in case...
8.) finished picture.
( I chose to sew the pictures onto another piece of fabric before I place them on the actual square... it is up to you. Can be sewn right onto your colored 9" x 9" squares.)
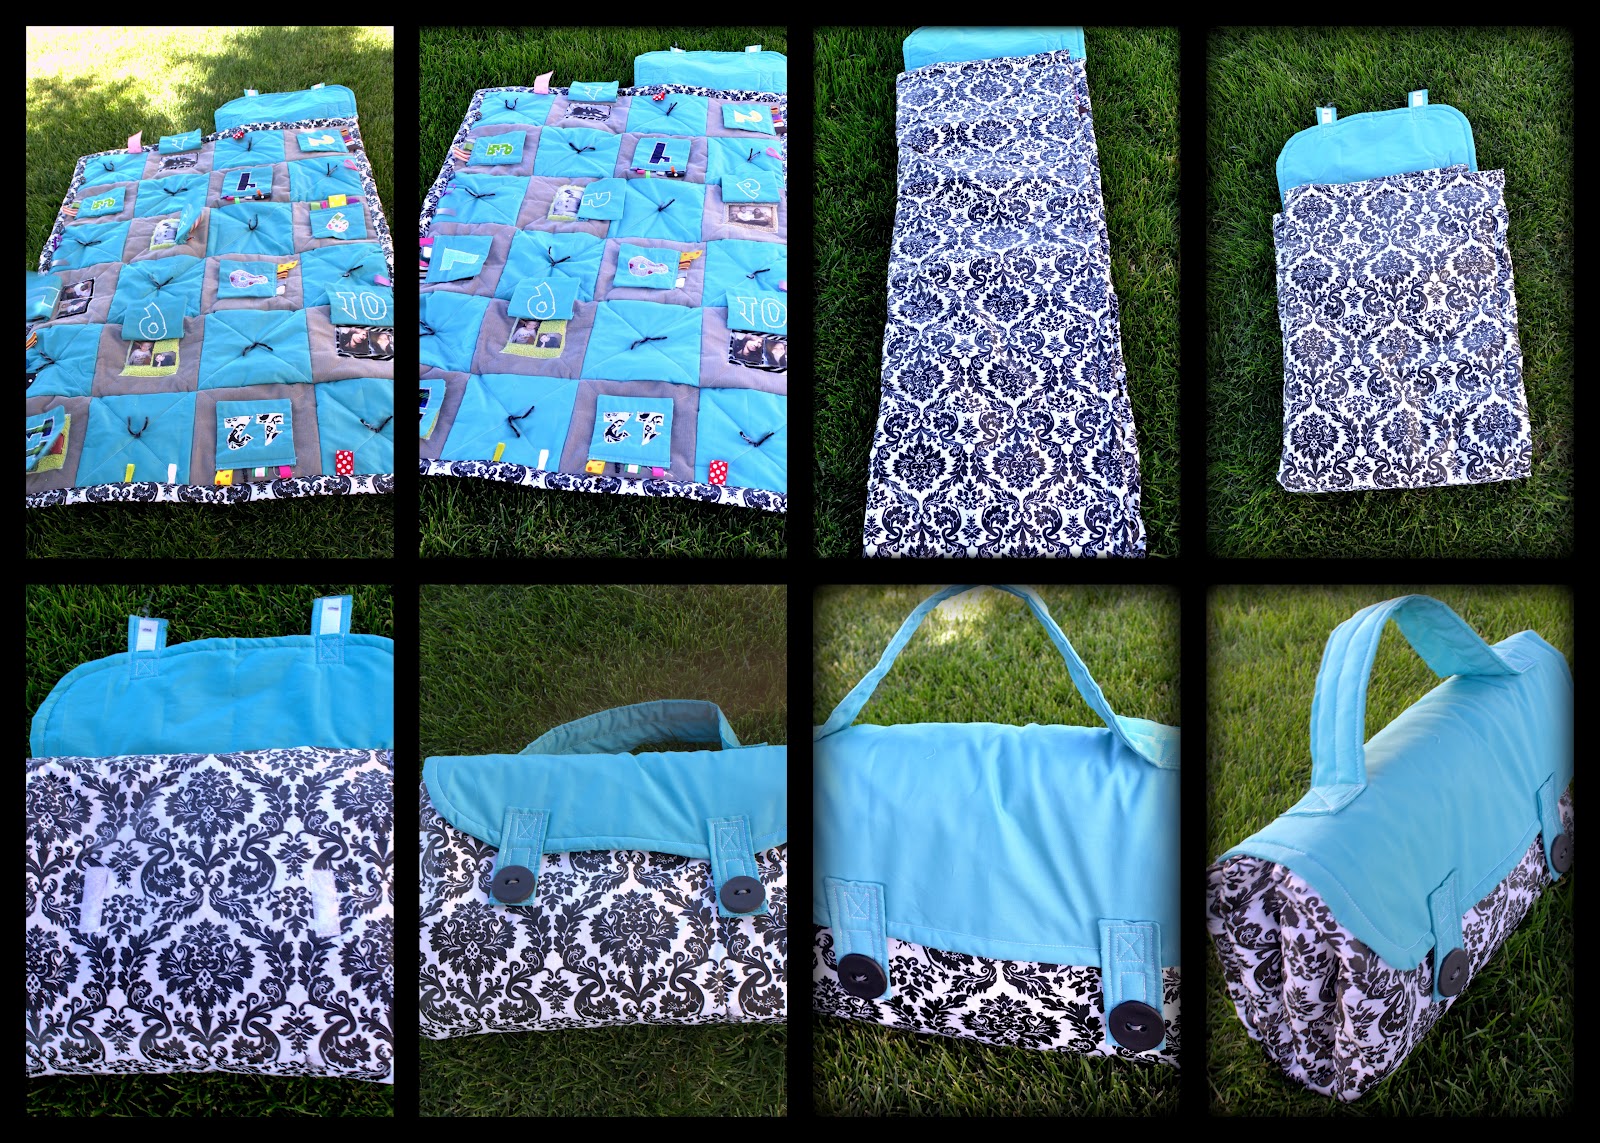
7.) sew the flaps over the pictures:

8.) lay out your blanket and sew squares together facing rights sides together to sew:

9.) backing:
lay top onto back, wrong sides together, and the back should now be bigger because of seam allowances you took in with the top .


start rolling over the back to edge the front tucking the seam under, pin it, don't sew yet.
10.) make the carrying case part:
I drew out a plan:

1.) I started by rolling it up to see how thick it would end up. I folded it in half longways, then brought the bottom up to fold it in half again, then folded it in half again. I did it this way because if I did get dirt on the bottom, I didn't want any of the backside to touch the front so that I could wipe it off later, and not get anything else dirty. So this is how it look after I folded it up...


2.) So I measured how long it was : 16" and how thick it was 5", So... I measured out two pieces of that blue sheet fabric again, to measure 16 1/2" long ( seam allowances), and 10" wide, so that it would fold over the 5" top and have about 5" of over hang onto the other side...Remember to cut two of these, and also one of batting, so that it can be padded. Next fold it in half and find something round like a plate, I used a lid. Place it over the corner, and cut along the shape to get an even rounded corner. cut the batting too.

3.) Sew these two pieces together, with the batting attached only to one side either top or bottom., not the middle or it will be on the outside when you flip it :). Leave a small opening so that it can be turned inside out when done. I left my opening along the flat back part so that I could hide it later when I sewed it onto the blanket.

4.) next make the handles and Velcro attachment strips:
I Measured out long 16" piece of fabric but only cut it 3" wide, and I cut it on a fold, just so it was one less seam I had to sew:) Also cut one piece of batting the same size.
Also measure out two smaller pieces measuring 5-8" how ever long you want. I cut 8" and ended up trimming them to about 5" but if you want longer, then 8". cut 4 so that there will be two each with a back and a front. Again as always cut batting for this too.
I guess I should have made patterns for this part in the beg. oh well.....
 |
| sorry its sideways... but the long one is your handle strap and the short ones are the velcro straps |
Next sew all of these pieces together just like you did for the flap, leaving an opening so that you can turn them right side out, and have the batting on the inside. Turn the ends in , and sew across catching all loose ends inside.

5.) Next I did some top stitching around the edge of the flap for looks, then I sewed the velcro onto each strap, just going around the edge of each piece I cut. I cut them to match the length of each little strap. Then add some decorative top stitching to the edges as well. Because there is batting inside the decorative stitching pops:) Sew both of these onto the flap where you would like, making sure that they are even distanced from the edges. I also sewed on the strap bringing it in 2 1/2" from each edge, and sewed in on nice and good with a square and an "x"...

6.) sewing it onto the blanket:
I rolled the blanket up how I wanted it rolled again, and marked where the flap would be attached, making sure that the handle would sit onto of the square folded part. I pinned in to that the top of the flap the handle side was laying face down onto the black and white damask part. I sewed it all the way across, lining it up with the end of the blanket on the top there. I didn't line it up on the far right because that is where the seam folds over to the front, and acts as the blanket binding... so leave a little room.

then flip the flap towards the seam you just sewed so that the handle is now on top, and sew another seam across a little wider in than before hiding the first seam and that little opening you left to turn the whole thing inside out in the first place:)

Almost done!!! All that is left is to roll it up find where the tabs end up and sew some Velcro onto that spot, making sure it only goes through the backing and not onto the front. This is why you have not sewn the binding down yet....:)
11.) Sew down the edges!!
Pin in all closed again making sure to smooth out wrinkles, and start sewing it down on top with the blocked square side up. The great thing about doing an edge this way, is the fail safe back side. If using bias tape like I usually do, it seems almost impossible not to miss getting the back edge of it in the top sides seam. With this way, you don't have to worry about it, and it looks clean and professional, plus it added a little pizzazz to the front:) I tucked in small ribbons and loops as toggles for her toys into the seams here and there...
Enjoy your blanket, and the sunshine!!
When your done fold it up and go!!!
I hope this all makes sense, email me with questions, or just comment below!
Happy creating!

4 comments:
This is AMAZING--I don't know how you figure all of it out! Also, very well executed--everything looks very squared off and professional, because you are!
However, I noticed no pictures of me...our date tomorrow is cancelled.
Amazing Play Mat ! You inspired me to make my own, but i'm quite a newbie in sewing. When you have all your squares, how do you sew them together so it's nice and smooth everywhere ? I cant figure that out... Thanks !
thanks so much for sharing this. i love this project. i made one for my niece and she likes looking at all the pics under the flaps :)
I shared this project on my blog hope that's ok :)
Post a Comment